2020
Fundamentals
Informative
macro
Tutorial

Stacked

April 4, 2020
Stacked

Essentially, focus stacking can help you get a deeper depth of field on your subject without using narrow aperture sizes (larger f-stop numbers.) It will allow you to highlight your subject by blurring the background with a large aperture, while keeping your subject completely in focus. 

Focus stacking affects depth of field, determining how much of the image is in focus. For macro photography, getting up close creates a shallow depth of field; this means only a small portion of the image is sharp.

Focus stacking merges multiple photos that were taken at different focus distances. In the most basic sense, one image will focus on the closest point of the subject, the next in the middle, and the next on the farthest point, many more images may be used to fill in the gaps. When those photos are merged, the resulting image has a much deeper depth of field than the original. Focus stacking can be used when you a shooting a bug or plant to see the complete bug or plant in focus.

When setting up the camera for focus stacking, we recommend a sturdy tripod with a strong head to hold the cameras position while you are adjusting the focus manually on the lens. For this example we will be shooting a computer motherboard.

The Loadout

Here’s a list of the equipment (and software) we used:

  1. Nikon D810
  2. Nikon AF-S VR Micro-Nikkor 105mm f/2.8G IF-ED macro lens.
  3. A sturdy tripod
  4. Control My Nikon by Tetherscript Technology Corporation
  5. Adobe Photoshop
  6. Fotodiox Pro FACTOR Radius Pico
  7. Fotodiox Pro FACTOR Radius Mini

The Process

Focus stacking requires layering several images over each other, a job that’s much easier to do when your camera is on a tripod. In the demo below we will be working in a controlled environment (inside), but the same principles can be applied outdoors.

1) Select your subject, like the motherboard in our demo; for our purposes we will focus on individual components of the motherboard.

2) Place the subject on a table making it easier to get up close with your camera and tripod, if possible.

3) Set your composition, then lock your tripod head in the correct orientation so the camera doesn’t move between shots.

4) Focus on the front edge of your subject and take the first image.

5) Focus deeper into your subject (a little further away) than in the initial shot and take another image.

6) Repeat this process until you have gotten the entire subject in focus. We recommend at least three images. Note: while this can be done manually, software like Control My Nikon make the process nice and simple.

As you can see from the metadata, our settings for this shot were 1/60 Sec, f/6.3 ISO 200. F/6.3 is near the middle of the aperture range, which is ideal. Shooting at the widest available aperture lets in the most light, but sacrifices some sharpness, while shooting at the narrowest aperture available can cause diffraction and may not provide the background blur desired.

These are the nine images we used to create a single focus stack:

1 / 9
2 / 9
3 / 9
4 / 9
5 / 9
6 / 9
7 / 9
8 / 9
9 / 9

Here is the completed image after the merge:

Post-Production

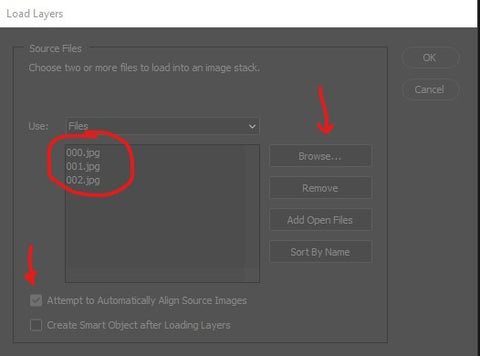
1) Once you have the images you wish to stack, open Photoshop. Next, click on “File” at the top of the screen, then hover over "Scripts" near the bottom of the menu (between "Automate" and "Import"). From the flyout menu select and click “Load Files into Stack…”


In the new pop up window, click on “Browse” to locate the files you wish to stack, make sure to check the box next to “Attempt to Automatically Align Source Images,” then Click OK.

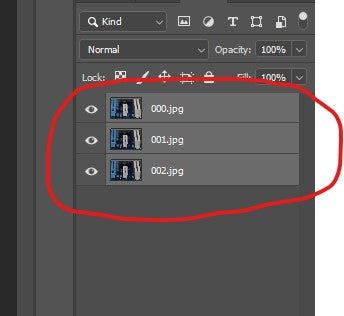
2) After Photoshop has opened the files in the workspace, select the images to stack in the Layer panel; when they are selected click on “Edit” at the top of the screen, find and select “Auto – Blend Layers…” approximately halfway down the list.

3) Select “Stack Images” and check the box next to “Seamless Tones and Colors,” then click OK.

After some processing time you will see finished layers in the Layer panel. Your stacked image is complete and you can save it in whichever format you like, such as Jpeg or PNG.


That's how we created this STACKED macro image.

Leave a comment

Please note, comments need to be approved before they are published.